You may want to add custom information to your user profiles and your private content. For example, to keep track of your customer addresses and phone numbers, or simply to add a field to indicate a due date on your invoices. The Advanced Custom Fields Integration allows you to do that with the help of the Advanced Custom Fields plugin by Elliot Condon (aka. ACF).
Setup
ACF Integration can be easily installed by uploading the corresponding zip file to your WordPress site’s plugins directory. If you don’t know how to do that, please refer to our guide about installing add-ons.
Once installed and active, the ACF Integration add-on could be complaining that you don’t have the ACF plugin (or that the one you have is not active, or not a supported version). In this case, please install and activate ACF v5+.
Once both ACF and ACF Integration are installed and active, there should be no error message left and you can start adding the fields you want.
Using the Advanced Custom Fields plugin
In this quick tutorial, we will not cover the use of the ACF plugin. Elliot and his team already have a very well made documentation and you should have a look at it in order to understand how it works. We will focus in the next two sections on the practical use of ACF to add information to our user profiles and to private content.
User profile fields
- Create a field group (see the ACF documentation about creating field groups).
- Add a title (will be hidden on the frontend).
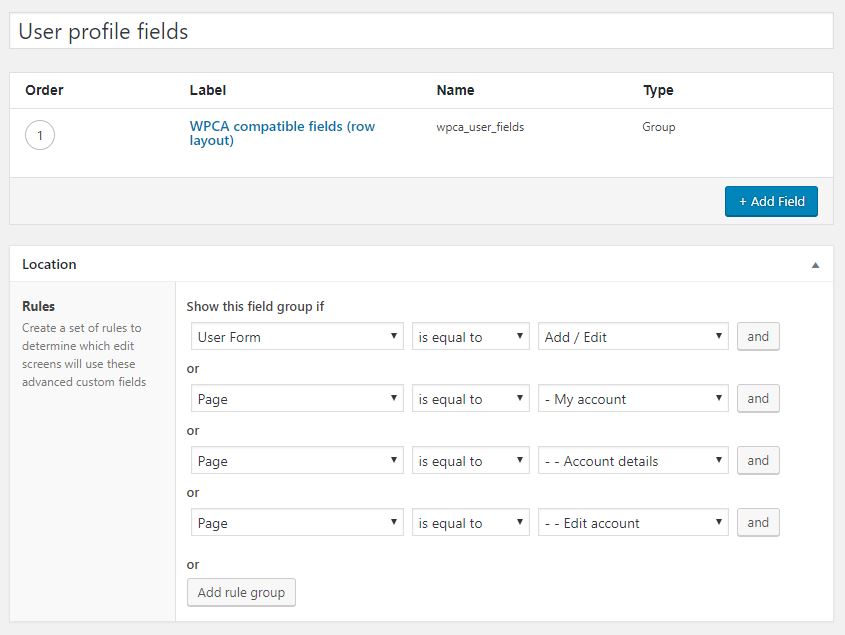
- Now, we will configure the group to make it appear in the user profile. In the “location” box, set the fields to match the following criteria:
User Form->is equal to->Add/Edit- OR
Page->is equal to->My account - OR
Page->is equal to->Account details - OR
Page->is equal to->Edit account
- This means that this group and the corresponding fields will be visible on the user-related pages (profile pages and forms in the frontend and in the admin area).
- Create a field and select
type->group. - Add a title to this field (will be shown on the frontend).
- Select the layout for this field. You can choose between
block/table/row. - Finally, start adding sub-fields into the group-type field that you just created. You can even add some more group-type fields.

Registration fields
- Create a field group (see the ACF documentation about creating field groups).
- Add a title (will be hidden on the frontend).
- Now, we will configure the group to make it appear in the registration page. In the “location” box, set the fields to match the following criteria:
User Form->is equal to->Register- OR
Page->is equal to->Register(only required if you own the authentication forms add-on).
- This means that this group and the corresponding fields will be visible on the user-related pages (profile pages and forms in the frontend and in the admin area).
- Finally, start adding sub-fields into the group-type field that you just created. You can even add some more group-type fields.
Private content fields
- Create a field group (see the ACF documentation about creating field groups)
- Now, we will configure the group to make it appear only for the private content type we want. In the “location” box, set the fields to match the following criteria:
Post Type->is equal to->Private page- OR
Page->is equal to->Update private page(only required if you own the front-office publishing add-on). - OR
Page->is equal to->Create private page(only required if you own the front-office publishing add-on).
- This means that the group and the corresponding fields will only be visible for private pages.
- Finally, give that group a title and start adding fields.
Known limitations and issues
- ACF fields won’t show on the user
my-accountandaccount-detailspages until the user save his profile at least once. - The following fields are not working on the frontend of WP Customer Area:
- Wysiwyg field
- Gallery field
- Color picker field

